Friday, December 5, 2008

Debugging JBoss AOP Apps Tutorial - Part 3

This is the final part of our tutorial on debugging. In this part, we will show how to debug the overloaded-advices example step by step. This example comes bundled with JBoss AOP release, so all you need to do is to download the 2.0.0.GA release and start following the next steps.

First, create a project for the overloaded-advices tutorial example using Eclipse (the URL location is jboss-aop-2.0.0.GA/docs/aspect-framework/examples/overloaded-advices) and solve classpath issues by adding the JBoss AOP jars to the classpath (just include the jars of the jboss-aop-2.0.0.GA/lib directory).

Now, add a breakpoint to the Driver class, line 29, where there is a call to POJO constructor, the first joinpoint of the example that will be intercepted:


Configure a Java Application execution to run the Driver class, setting the AOP arguments as has been showed in the first part of this tutorial.

  1. Start debugging this application.
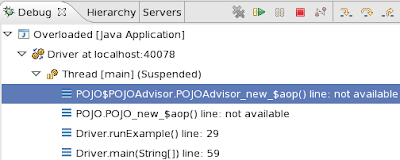
  2. Once Eclipse stops at line 29, press F5 to enter the constructor execution joinpoint. This is what you are going to see:


  3. You see that the previous step resulted in a stack trace that shows a wrapper method belonging to the POJO class: POJO.POJO_new_$aop(), followed by the wrapper that is our focus of interest, the one belonging to the Advisor class: POJO$POJOAdvisor.POJOAdvisor_new_$aop().
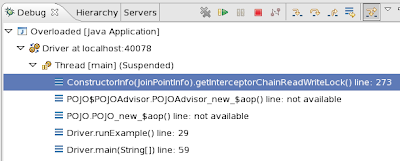
    However, the top line of the stack is one of the “noises over the line” mentioned in the previous tutorial part. That line is a call to a ConstructorInfo method that returns some a sort of concurrency lock. So, press F7 to return to the Advisor wrapper method. Once you do this, you should see the stack trace below:


  4. Whenever you are in the Advisor wrapper method, you should press F5. This is what we get once we press F5:


  5. Oh no! Another “noise”. This time, more code handling locks. Now you know what to do. Press F7, return to the wrapper method, and press F5 on this wrapper until you enter a new block of code. Continue this process until you have finally entered the Joinpoint class.
    These are the “noises” you will run into during this process:


    Note that the second “noise” (ConstructorInfo.hasAdvices()) will appear twice in a row.
    After step returning those “noise” elements with F7, Eclipse finally enters the first advice execution:


  6. Once you get to the advice, debug it as you would normally. As this is a just tutorial, we are going to press F6 until we return to the Joinpoint class:


  7. Back to the JoinPoint class. Press F5 until you find the next advice. Before getting there, you are going to run into another couple of “noise” elements:


    On the screen above, you see an info call at the top of the stack. As mentioned previously, this is something you should skip with F7. Right below it in the stack, there are three calls to constructors (<init> methods). Again, we have mentioned previously that calls to constructors should be skipped with F7. Skipping them and then pressing F5 will take you to the next advice:


  8. You should debug this advice as you did in step 6, with F6. There is one line, however, that you must treat differently and press F5: line 39 of JoinPointAspect, containing the statement return invocation.invokeNext();

    This line, as you should know, is going to invoke the next around advice. If there are no around advice, it is going to call the joinpoint itself. So, if you want to debug the POJO constructor execution, you must enter the invocation.invokeNext() call. After pressing F5 in this line, you will see the following stack:


  9. At this point, you have reached the joinpoint being intercepted. Whether it is a method or constructor, you can debug it as if this was a normal Java application. If it is a field set or a field get, you are not going to be able of debugging it though. But you can check the new value of the field after a field set joinpoint once you get back to your normal application at step 13.
    In this case, the joinpoint is a default constructor, so there are no lines to debug at all. Just press F6 to return to the previous item in the stack:


  10. So, we are back to the Joinpoint class. Now, you should press F5 again following the tips given in step 5. Doing so will take us to the last advice:


  11. Repeat step 6 now, pressing F6 to return to the Joinpoint class:


  12. Pressing F5 now does not take us to the next advice,as all advice have already run. It takes us back to the advisor wrapper method.


  13. You are done! Just press F7 twice to exit both wrappers and go back to the driver class. Now you can continue debugging. Try to enter the next joinpoints of the overloaded-advices example to see the other advice running! Remember that you must press F5 on field read and field write joinpoints, in order to enter their wrapper method code.


Next Steps

Once you have walked-through the steps to debug the overloaded-advices example, you are ready to debug any other JBoss AOP application you like. Try doing so using a different JBoss AOP tutorial, or just try debugging your own JBoss AOP application.

The next time you need to debug an application that uses JBoss AOP, I hope it is going to be easier for you to track bugs down with the tips we have presented in this tutorial. Good luck!
Saturday, November 29, 2008

Aophelper

With the release of JBoss AOP 2.0.0 we also included a few new tools. One of them is an application we called Aophelper. The idea behind it was to create a tool for people to use aop without the hassle of setting up aop jars, commandline options, creating an antscript etc. We tried to make an application to ease the use of aop or atleast make it easier for people to start using aop.

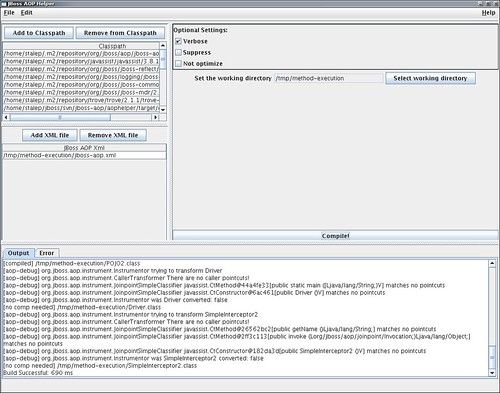
Aophelper is a small swing application that provide all the dependencies needed to run JBoss AOP and has features to add options to JBoss AOP. Aophelper has two modes; compile mode and run mode (use the File menu to change between the modes). They are nearly identical (visually), but the do different things. Here is a view of the compile mode:


- a larger picture can be found here.

The compile mode will try to aop compile classes specified by a path. If additional jars are needed, they can be added to the classpath. Then finally we need to specify a jboss aop xml file. After this is we can press compile and all the classfiles that where specified by the working directory option will be aop compiled.

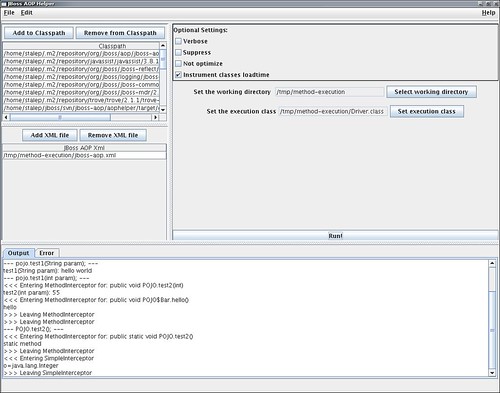
The run mode will try to run either a aop precompiled program, or it will run the program with loadtime weaving (aop is weaved into the class when the program starts, no changes are done to the .class files). Here is an example of the run view:

- a larger picture can be found here.

The only difference between run and compile mode is the input field were you add the main execution class and the checkoption to choose if you want to enable runtime weaving. Aophelper can also save your settings so its very easy to get back on track with an application you've used before.

Even though Aophelper support most of the basic aop functionality, Aophelper is currently in a beta stage where much will change and additional features will be added. Some points we have on the todo list:

  • Export settings to a simple ant build file
  • Rewrite ui to make easier to use and support size changes
  • Better errorhandling

Aophandler is bundled in the JBoss AOP distro. Go into the aophelper directory and run it by executing either aophelper.sh on linux/mac/etc or aophelper.bat on windows.

You can always use the latest version from svn. Download JBoss AOP and run: mvn install -Prun-aophelper inside the aophelper directory and you can check out the latest changes.

Tuesday, November 4, 2008

Debugging JBoss AOP Apps Tutorial - Part 2

In this part of the tutorial we are going to see what JBoss AOP classes and methods are involved in the call of advices, so you know how to interpret those when they appear during debugging.


Which classes call advice and trigger intercepted joinpoints?

When a joinpoint is weaved, its code is replaced by code generated by JBoss AOP. This new code wraps the original joinpoint code, in a way that your original joinpoint is still going to execute, but a few steps later. As this code is generated by JBoss AOP, you will not be able of seeing the code lines being executed during debugging. That is ok. You should keep in mind only what are the main tasks involved in each step and press F5/F6/F7 until you enter your advice or joinpoint code.

This is the sequence of the elements involved in the execution stack when a weaved joinpoint is executed:

Advisor -> JoinPoint -> advice + joinpoint

As you can see, there are two helper classes involved. One of them is the Advisor class. Specifically, the wrapper method contained in this class is responsible for calling methods on the JoinPoint class. And the JoinPoint class is the one that is actually going to invoke your advice and your joinpoint, the points that you want to be able of debugging.

Advisors

An Advisor is responsible for managing interception of your classes. There is an Advisor per intercepted class, which manages all the advice stacks related to that specific class. Similarly, there is an Advisor per instance and this advisor is going to appear at your execution stack only when there is specific configuration per instance, which is rare.

From version 2.0 on, the default weaving mode is the generated-advisor mode. From this point on, we will assume you are using this mode. In this mode, advisors are also responsible for generating code that will invoke your advice and joinpoint, and for invoking this code as well.

It is very easy to identify an advisor on the debugging stack trace. The advisor of class POJO is called POJOAdvisor, and is an internal class of POJO. In this case, you are going to see POJO$POJOAdvisor as the name of the advisor class in the stack trace.

Wrapper Methods

Every time a joinpoint is weaved by JBoss AOP, this joinpoint execution is replaced by a call to a wrapper method. These methods know what to do to trigger execution of your advice and the intercepted joinpoint.

The signature of a wrapper methods varies according to the type of joinpoint you are intercepting. For example, the wrapper of a method called public void run(Withdrawal) would have the signature:

public void run_N_8003352271541955702(Withdrawal)

Once you start debugging, you

will get used to the signatures of wrapper methods and will start recognizing them right away. For now, there is a simple rule you can use to identify those. They are part of generated advisors and are the first extra item that will appear on the stack trace when you are debugging an intercepted joinpoint.

That said, if the method run of the previous example belongs to a class named Withdrawal, you are going to see something like this:


Note that for some types of joinpoints, such as field read and constructor execution, you are going to see an extra wrapper method at the stack. This extra wrapper has the same signature as the wrapper belonging to the Advisor class, but it will instead belong to the class that contains the joinpoint being executed:


In this picture, we see that there are two wrappers: intField_w_$aop(Object, int), belonging to the POJO class, and POJO$POJOAdvisor$intField_w_$aop(Object, int), belonging to to the POJOAdvisor class.

Notice that those method names do not indicate a exotic taste, as they are made this way so we can avoid crashing with any name of other classes/fields/methods you may have included in your application. Plus, those method names make it easier to identify code generated inside of JBoss AOP.


JoinPoint classes

A JoinPoint class is generated for each joinpoint of your system. Their names always start with "Joinpoint", followed by something that identifies the joinpoint they represent, like the example below:

JoinPoint_run_N_80033522715419555702_2

JoinPoint is your main class of interest here. Despite the fact that you ca not see its code or the lines being executed when debugging, this class is responsible for calling your aspects and invoking the joinpoint they represent as well. So, if you have advice A and B intercepting execution of, say, void myMethod(), it is the JoinPoint class that will invoke A, B and myMethod as well.

The entry point for the JoinPoint class is the invokeJoinPoint method:


When debugging this method, and the inner methods it calls, you want to use F5 so you can enter your advice and joinpoint codes in order to debug them.


Noise over the line

The elements presented in the previous section are not the only ones you are going to face when debugging your weaved joinpoint. Other calls will appear in the stack. While the elements you are going to see are important for the inner working of JBoss AOP applications, they are not your focus of interest when debugging.

So, the following elements of the stack trace are not going to take you to the execution of advice or the weaved joinpoint, and that is why we say they are “noise over the line”:


  • Info classes: are helper classes that contain information related to each joinpoint (such whether there are advice to be applied to that joinpoint, and which advice are those). Sometimes, the JoinPoint class will enter an info class to query that type of information. The main info classes are: FieldInfo, MethodInfo, ConstructorInfo, MethodByMethodInfo, ConByMethodInfo, ConByConInfo, and MethodByConInfo.


  • Constructors: as you probably know, they are represented by the word on the stack trace;


  • Concurrent lock code: code that makes sure that interception is thread-safe;


  • JoinPoint class generation: the JoinPoint class we mentioned in a previous section is generated at the first time a specific joinpoint is reached:


  • Call to any other JDK class: though it is rare, you may run into a call to a JDK class when debugging a weaved joinpoint

All the points contained in the previous list should be skipped. So, whenever you see those, just press F7 to return to one of the points mentioned in the “Which classes call advice and trigger intercepted joinpoints?” section.


Debugging a joinpoint


Once you are more familiar with the elements presented in the previous sections, you are
ready to start.

Before continuing, lets recall what are the keys you can use during Eclipse debugging and what they represent:
F5: Step into
F6: Step over
F7: Step return

These are the steps you must follow when a weaved joinpoint is reached:


  1. The joinpoint is reached. The first thing you will notice is that, despite you can see the joinpoint code in your application, Eclipse will flag that it cannot find the line correspondent to the joinpoint. This is expected and indicates that your joinpoint has been weaved. Press F5 to enter the wrapper method.

  2. Now you can see the wrapper method of the Advisor class in the execution stack. This is the method that is going to invoke the JoinPoint class, so press F5 again.

  3. This is the tricky part. Besides invoking the JoinPoint class, the wrapper method performs a couple of other actions: enabling concurrent lock and invoking code to generate the joinpoint class are a few of those. Those actions are what we called “noise over the line”. Whenever you enter a block that is not part of the JoinPoint class, press F7 to return to the wrapper method.

  4. When you finally get into the JoinPoint class, press F5 constantly, until you enter your advice.

  5. If , before getting to your advice or joinpoint, you run into constructors ( elements in the stack), info methods, or any call to a JDK class, you should press F7 to return to the Joinpoint class;

  6. When you enter an advice, Eclipse will start recognizing the line numbers again and you will be able of debugging your advice just as any normal method of your application.

  7. The same holds for your joinpoint. If your joinpoint is a method or constructor, you are going to be able of entering those and debugging them normally.

  8. Once all advice and the joinpoint have been executed, the JoinPoint class is done with its work and execution will return to the wrapper method. When this happens, press F7 until you return to your normal application code.

TIP: When debugging around advice, remember of pressing F5 on the call to Invocation.invokeNext(). Or you won't be able of seeing the execution of other around advice, nor the execution of the joinpoint being intercepted.

In the next part of our tutorial, we are going to illustrate the steps above, walking you through a debugging process over Eclipse. See you there!

Tuesday, October 21, 2008

JBoss AOP 2.0.0.GA Released

JBoss AOP 2.0.0.GA has been released. It can be downloaded from here, the full release notes can be found here, and the updated documentation can be found here.

A lot of bugs have been fixed. Amongst all the new features, a few deserving special mention follow. A new weaving mode which allows before/after/throwing/finally lightweight advices has been introduced. The new weaving mode also allows more granular dynamic aop. It also integrates with the JBoss MicroContainer, which is in the core of JBoss 5, meaning that aspects are now being used in the core of JBoss 5! There is also some support for interception of access to array elements.

As usual the whole team has worked hard towards this release, but thanks to Flavia Rainone for working round the clock in the run-up to the release and to Ståle W. Pedersen for helping out a lot despite being on paternity leave. Finally, thanks to Paul Gier for helping move our build over to use Maven.

Upcoming features in the short term are a nicer way to add dynamic aop constructs, and an understanding of the OSGi classloaders in JBoss 5.

Tuesday, September 30, 2008

Debugging JBoss AOP Apps Tutorial - Part1

Now and then I run into users complaining they don't know how to debug JBoss AOP applications. Targetting those users, I decided to write this tutorial, that will explain you the basics on debugging JBoss AOP application to have you started right away. As we will see, it is extremely easy to debug a JBoss AOP application using an IDE as Eclipse. The tricky part is how to set up your environment and to get familiar with the JBoss AOP classes that will trigger your advices.


Debugging JBoss AOP Apps Tutorial - Part 1

In this tutorial we are going to show you how you can debug an application that uses JBoss AOP using Eclipse.

For this, you need to have your project set up in Eclipse without compilation errors.

Now, follow in these steps:

  1. Open the debug drop-down menu and click on Debug... as shown in the image below:

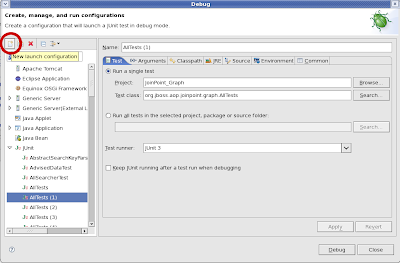
  2. On the Debug window, click the New launch configuration button:


  3. Configure your test as you would if your application didn't use JBoss AOP.
  4. On the Arguments tab, add the javaagent argument and define the system property “jboss.aop.path” as in the example:

    -javaagent:/home/fla/Development/workspace/jboss-aop/aop/output/lib/jboss-aop-jdk50.jar
    -Djboss.aop.path=/home/fla/Development/workspace/MyApp/src/resources/jboss-aop.xml


    Notice you have to fill those values with the path of the jboss-aop-jdk50.jar and the jboss-aop.xml in your system.

Now you are ready to go. Just add the breakpoints to the points you want to debug and start the debugging.

In the next part of this tutorial, we are going to explain the JBoss AOP classes you will run into when debugging and what you need to know about them in order to debug your application and your aspects successfully. Stay tuned!

Tuesday, September 9, 2008

JustJava and JBoss Brasil

Hello everyone!

I have great news from Brazil. First, I'm going to do two talks at JustJava, the largest Brazilian Java event.
The title of the first talk is "Dynamic Aspect-Oriented Programing and Adaptable Systems", and it will be held tomorrow at 16:00h. The second one will take place on Friday, 12th and has the title "Designing a JavaEE Server with IoC and AOP - A Study Case".
If you are attending to JustJava this year, go check out my presentations and let me know what you think of those subjects.

The second news is that Edgar Silva has founded a Brazilian JBUG, the JBoss Brasil. I've added an internal group dedicated to JBoss AOP project exclusively. I you are Brazilian or at least speaks Portuguese, feel free to join our group. For those that don't speak Portuguese, you are always welcome to join our forums and feel free to contact us in case you want to get involved in JBoss AOP project.

See you around!

Thursday, August 28, 2008

DZone Introduction to AOP article

I have written an introductory article to JBoss AOP on DZone. It can be found here.

Thursday, July 24, 2008

TDC 2008

The Developers Conference or TDC is a Brazilian conference about Java and Agile Development Methods that will take place in Sao Paulo. The event lasts two days and will start tomorrow.
If you are going to attend to this conference, it would be great to chat about the JBoss technologies. I will be there on Saturday, and will do a mini-presentation about JBoss AS 5 at the Red Hat stand (the time of the presentation is to be defined and will be informed at the RH stand).
See you there!

Wednesday, July 23, 2008

Dynamic AOP Tutorial - Part 2

In this second part of the dynamic AOP tutorial, we will show how you can perform dynamic AOP through our API. This is currently the only available way of using dynamic AOP in standalone applications.

The JBoss AOP API


Aspects, Interceptors and Advices

All aspects, advices, and interceptors are represented by factories. Notice that, internally, JBoss AOP does not differentiate advices from interceptors. They are both represented as interceptor instances, which results in uniform, transparent handling of interceptors and advices. This way, an interceptor chain is used for intercepting a joinpoint every time it is executed, and may contain even typed advices.
For that, JBoss AOP provides a factory capable of transforming advices into interceptors, the AdviceFactory.
Take a look at the main classes used to represent those elements, all located in the org.jboss.aop.advice package:

  • AspectFactory: responsible for creating an instance of an aspect. While you can provide your own implementation of this interface, the most commonly used implementation is the GenericAspectFactory, that creates aspect instances given the class of the aspect to be created.
  • AspectDefinition: this is how aspect factories are managed internally. Whenever you declare an aspect, JBoss AOP creates an AspectDefinition. This definition contains the aspect factory, the aspect scope, and the aspect name.
  • InterceptorFactory: responsible for creating instances of interceptors. To represent a simple interceptor, the GenericInterceptorFactory is used; the AdviceFactory represents advices.

The next example illustrates how you use those classes to represent an advice:
// aspect class
public class MyAspect
{
  public void helloWorld()
  {
    System.out.println(“Hello world!”);
  }

  public Object helloWorld2(Invocation invocation) throws Throwable
  {
    System.out.println(“Hello world!”);
    return invocation.invokeNext();
  }
}
-----
  public static void main(String [] args)
  {
    AspectFactory aspectFactory = new GenericAspectFactory(MyAspect.class, null);
    AspectDefinition aspectDefinition = new AspectDefinition(“myAspect”, Scope.PER_INSTANCE, aspectFactory);
    AdviceFactory adviceFactory = new AdviceFactory(aspectDefinition, “helloWorld”, AdviceType.BEFORE);
    ...
  }

In the first part of the example, we declare the MyAspect class, with two advices: helloWorld and helloWorld2. In the second part, we represent the aspect MyAspect and the advice helloWorld using the classes we have just learned. First, an aspect factory is created. The constructor of GenericAspectFactory must receive the class of the aspect, and an xml element. This second parameter allows to pass extra configuration to the aspect class. Since we are not loading anything from an xml file, the second parameter must be null.
Next, we create an aspect definition with the factory, defining also the name of our aspect (could be any unique name you wanted), and the scope of the aspect. Finally, we create an advice factory. This factory's constructor receives the aspect definition, the name of the advice, and the type of the advice. A second constructor is also provided. If you are declaring around advices, you can omit the advice type, as follows:
// declare the helloWorld2 advice as being of the default advice type, which is around
new AdviceFactory(aspectDefinition, “helloWorld2”);

Naturally, creating those elements is not enough, you must deploy them through our API. We will see how to do this in the next topics.

Binding Aspects to Pointcuts

Advices and interceptors are useless unless they are bound to a pointcut expression, indicating when they should be called. This takes us to the most important class of the dynamic AOP API, the org.jboss.aop.advice.AdviceBinding. This class contains a pointcut expression and a series of interceptor factories. Optionally, it can also contain a cflow expression.
It provides one constructor for dynamic AOP operations:
AdviceBinding(String pointcutExpression, String cflow)

Designed specially for dynamic AOP operations, this constructor creates a binding, defining the pointcut expression and the cflow expression you intend to use. If there is no cflow expression, the second parameter should be null. While there is a second constructor provided by AdviceBinding. It is for internal use only, so always use the one above.

The following methods add advices and interceptors to a binding:
  • addInterceptor(Class clazz)
    Adds an interceptor to the binding. Always use this method when you are binding interceptors.
  • addInterceptorFactory(InterceptorFactory interceptorFactory)
    Adds an interceptor factory to the binding. You must use it to add advices, in the form of AdviceFactory instances (as we have seen above, this class is an implementation of InterceptorFactory, and creates interceptor adapters to call your advice).

AspectManager

Most of the functionalities provided by JBoss AOP have an common entry point: the org.jboss.aop.AspectManager class. This class is our facade and provides all sort of AOP functionalities. Among them, you can find the dynamic AOP methods:
  • addAspectDefinition(AspectDefinition definition): deploys an aspect
  • addAdviceBinding(AdviceBinding binding): deploys a binding
  • removeAdviceBinding(String bindingName): removes a binding
  • removeAdviceBindings(Collection bindings): removes a collection of bindings.

Advisor and InstanceAdvisor

Every weaved class implements the org.jboss.aop.Advised interface. Through this interface, you can access the class Advisor, a sort of AspectManager with scope limited to that single class, and the InstanceAdvisor, with an even more specific scope, a single instance.
Take a look at the methods you can call on the Advised interface:
  • Advisor _getAdvisor()
  • InstanceAdvisor _getInstanceAdvisor()
The InstanceAdvisor class provides dynamic AOP operations that affect only the instance it advises. Its main methods are:
  • insertInterceptor(Interceptor)
    Inserts an interceptor in the beginning of all interceptor chains associated with the advised instance.
  • appendInterceptor(Interceptor)
    Adds the interceptor to the end of the instance's chains
  • removeInterceptor(String)
    Removes an interceptor that has been inserted or appended. The parameter specifies the name of the interceptor to be removed.

Putting it all together

Take a look at the following example:


AdviceBinding binding = new AdviceBinding(“execution(public !static void Pojo->*(int, long))”, null);
binding.addInterceptor(MyInterceptor.class);
AspectManager.getInstance().addAdviceBinding(binding);

This example adds a binding dynamically. It is the API equivalent of the xml binding below:

<aop>
  <binding pointcut="execution(public !static void Pojo->*(int, long))">
    <interceptor class="MyInterceptor.class/"/>
  </binding>
</aop>
Now, an example with advices:

// declares the aspect class
AspectFactory aspectFactory = new GenericAspectFactory(MyAspect.class, null);
AspectDefinition aspectDefinition = new AspectDefinition(“myAspect”, Scope.PER_INSTANCE, aspectFactory);
AspectManager manager = AspectManager.instance();
// deploys the aspect
manager.addAspectDefinition(aspectDefinition);
// creates the advice factory
AdviceFactory adviceFactory = new AdviceFactory(aspectDefinition, “helloWorld”, AdviceType.BEFORE);
// creates the binding
AdviceBinding binding = new AdviceBinding(“execution(public !static void Pojo->*(int, long))”, null);
binding.addInterceptorFactory(adviceFactory);
// adds the binding
manager.addAdviceBinding(binding);

The example above declares and deploys an aspect, then creates an advice factory to represent an advice of this aspect. This advice factory is added to a new advice binding, that is registered at AspectManager by a call to AspectManager.addAdviceBinding method. It is the API counterpart of the xml below:
<aop>
  <aspect name="”myAspect”" class="”MyAspect”/">
  <binding pointcut="”execution(public !static void Pojo->*(int, long))”>
    <before aspect="”myAspect”" name="”helloWorld”/">
  </binding>
</aop>

To remove the advice binding, you can call the removeAdviceBinding method:
manager.removeAdviceBinding(binding.getName());

Notice that the AdviceBinding.addInterceptor and AdviceBinding.addInterceptorFactory methods can be called only before you deploy your binding. Doing so after that will cause inconsistencies.

Our last example adds an interceptor to a single instance of the class Pojo:
// create Pojo
Pojo pojo = new Pojo();
// retrieve its instance advisor
InstanceAdvisor instanceAdvisor = ((Advised) pojo)._getInstanceAdvisor();
// append an interceptor to the chains of this instance only
instanceAdvisor.append(new MyInterceptor());
// executing someMethod will trigger MyInterceptor
pojo.someMethod();


If you create another instance of Pojo, this instance will not be intercepted by MyInterceptor, as the interceptor has been added to the InstanceAdvisor of pojo:
Pojo otherPojo = new Pojo();
pojo.someMethod(); // will not be intercepted by MyInterceptor


Wrapping up

This second part of the tutorial showed the main classes involved in the dynamic AOP API. To add an aspect at runtime you have to
  1. declare the aspect, by adding an AspectDefinition to AspectManager
  2. create a binding, with the pointcut expression of your choice, and add interceptor factories to it
  3. add the binding to AspectManager (it is at this point that the binding will be deployed to your system)
You have two options to add interceptors:
  • create an AdviceBinding containing interceptors and add it to AspectManager as above
  • use the InstanceAdvisor API

Next Steps

-> Take a look at our dynamic AOP example. It is available as part of our releases. Run the example and play with it:
  • add advices to the advice binding, instead of interceptors;
  • create an advice binding that contains interceptors and advices mixed.
-> Check the JBoss AOP Javadoc to learn more about all methods provided by the InstanceAdvisor class. Edit the dynamic AOP example, this time using the InstanceAdvisor methods you learned. Try removing an interceptor at runtime.
-> Get engaged! Help us design a state of the art dynamic AOP API, which will be part of a future release:
http://www.jboss.com/index.html?module=bb&op=viewtopic&p=4166298#4166298

Monday, June 30, 2008

Dynamic AOP Tutorial - Part 1

The goal of this tutorial is to show how to use dynamic AOP with JBoss AOP. Notice that, by dynamic AOP, we mean the dynamic weaving of aspects, and not dynamic pointcut expressions (such as cflow), as other tools refer to them using the same term.

There are two ways of using dynamic AOP with JBoss AOP: hot deployment (when running your application in AS); or through our API.

In the next topics, we will show what are the prerequisites for dynamic AOP, and how to use hot deployment of aspects at the server. In the second part of our tutorial, we will see how to use our API to perform dynamic operations.

What is Dynamic AOP?

Dynamic AOP or dynamic weaving consists of adding/removing aspects to/from your system at runtime, without need for recompilation or rebooting.

In practice, this means that you can enable and disable aspects at runtime, including aspects previously unknown to your system. There are several scenarios where this functionality comes in handy. For example, to debug failures that show up only after your application has been running for a long time. In a situation like this, a lot of time could be saved as dynamic AOP will not require the system to be rebooted in order to attach an aspect to debug your application. Furthermore, dynamic AOP allows the runtime addition of extensions to a system that cannot be rebooted frequently. Another example of applicability is to fix an aspect that contains a bug, or that needs to have its functionality extended at runtime.

JBoss AOP supports dynamic AOP by rebuilding interceptor chains associated with a joinpoint when aspects are added and/or removed. If hot swap is enabled, JBoss AOP also instruments the code at runtime to insert/remove invocations to these chains whenever appropriate. Otherwise, the calls to chains are inserted during compilation or class loading (depending on whether you are using compile time or load time weaving).

Preparing your Application for Dynamic AOP

In order to perform dynamic AOP operations, JBoss AOP must know beforehand which joinpoints need to be instrumented, so that the invocations to interceptor chains are added to the code before it gets executed.
This restriction applies even with hot swap enabled. Due to security constraints of the JVM, the list of methods, constructors, and fields of a class cannot change at runtime. Nor can their signatures. For weaving, JBoss AOP inserts auxiliary fields and methods into your class bytecodes. Given the JVM constraints, this step must be performed before your code gets executed and, hence, the joinpoints to be instrumented must be known at the first weaving stage (compile time or loadtime weaving).

To indicate which joinpoints must be instrumented for dynamic AOP, you must use prepare expressions. A prepare expression can be declared either in an xml file or as an annotation. Look at the example below:

<aop>
  <prepare expr="all(Pojo)"/>
</aop>


This is the content of a jboss-aop.xml file. This file contains a single declaration of a prepare expression, but it could contain as many as you wish. Naturally, it could contain as well tags for non-dynamic AOP purposes, such as pointcuts, bindings, introductions, etc.

Prepare expressions can also be declared in the form of annotations:

@Aspect(scope = Scope.PER_VM)
public class MyAspect
{
  @Prepare ("all(Pojo)")
  public static Pointcut preparePOJO;

  @PointcutDef("execution(Pojo->new())")
  public static Pointcut aPointcut;
}


Notice above the similarity in the syntax of the declaration of a prepare expression, with the @Prepare annotation, and of a pointcut expression, with the @PointcutDef expression. Except for the annotation used, their syntax is the same.

The annotation @Prepare can also be used to annotate plain-old Java classes:

@Prepare
public class Pojo
{
  ...
}


In this case, it indicates that the method execution and field access joinpoints contained in Pojo class must be prepared for runtime weaving of aspects.

Joinpoints matched by plain pointcut expressions can also be the target of dynamic AOP operations. JBoss AOP treats joinpoints matched by pointcuts and joinpoints matched by prepare expression in a very similar way.

The main difference between the two types of expressions lies in their semantic meaning. When you run across a prepare expression, you immediately know that it is being declared for dynamic AOP purposes. On the other hand, if you see a pointcut expression you expect it to be used in one or more bindings. For readability, always prefer to use prepare expressions over plain pointcuts to indicate dynamic AOP usage.

In addition, JBoss AOP does not affect the control flow of joinpoints matched by prepare expressions when using hot swap. The control flow of those joinpoints will be affected only after a dynamic aspect addition is performed, which means you will have a better performance when prepare expressions are used appropriately.

Hot Deployment of Aspects

Hot deployment is the most straightforward way of using dynamic AOP with JBoss AOP, and is available for JBoss AS.

In JBoss AS, all deployment units, such as ears, wars, jars, can be hot deployed. JBoss AS will automatically load the applications added to the deploy folder, and unload them when their units are removed from the deploy folder.

The JBoss AOP deployment units have the .aop suffix. By deploying such an unit at runtime, the aspects contained in it will be automatically deployed to all prepared joinpoints of the previously deployed applications. If you are running the server with load time weaving, all the applications deployed after this moment will also be instrumented by JBoss AOP to insert the aspects contained in the deployment unit, according to the bindings and pointcuts it contains.
Similarly, when a .aop file is removed from the deploy dir, the bindings it contains will be automatically removed from the running applications.

As an alternative to using .aop units, you can use other deployment units and xml files to hot deploy aspects to the server. In this case, the aspect classes are bundled into a non-aop deployment unit (such as a .jar or an .ear) and deployed to the server. The binding declarations are deployed to the server separately in an xml file whose name must end with -aop.xml. The effect of this two-part deployment is the same as you get by deploying an .aop file, but with one advantage. This type of deployment allows you to redeploy only the *-aop.xml file, without causing the aspect classes to be reloaded. The simple removal of your *-aop.xml file will cause the bindings to be undeployed. And the addition of a new *-aop.xml file will cause the bindings declared in it to be deployed to the server.

Wrapping up

In a nutshell, we have seen that:

  • only joinpoints matched by prepare and pointcut expressions during compile/load time weaving can be the target of dynamic operations.

  • to use dynamic aop in the AS, you can deploy and undeploy .aop files.

  • an alternative is to deploy xml files ending in -aop.xml, containing the declarations of bindings and pointcut expressions.


Next Steps

Take a look at the injboss example, available as part of the JBoss AOP documentation. It shows the different ways of packaging aspectized applications to be run in JBoss AS. Try running those examples and playing with dynamic AOP to see it in action! (For example, run $ ant deploy-basic-lt-war and try removing the jboss-aop.xml file from your server deploy dir in order to have the aspects undeployed)

In the next part of the tutorial, we will show how to use the JBoss AOP API to perform dynamic AOP operations. Stay tuned!

Friday, May 2, 2008

Typed Advices Tutorial - Part 3

We have been very busy with implementing the main issues left for 2.0.0.GA. But, finally, I have digged sometime to finish this tutorial. Here is the third and final part. Enjoy!

Typed Advices Tutorial - Part 3

So far I have talked about the general form of the JBoss AOP typed advices, and how to declare them in your jboss-aop.xml file. We also saw how to declare them through annotations. This is all you need to know to get started. This final part of the tutorial goes deeper into the options available for typed advices. We will show a complete list of annotated-parameters available, and talk about the possibility of overloading advices.

Annotated Parameters Revisited

In the previous part, we saw examples that used @Arg, @Target and @Args annotated-parameters. Below you will find the complete list of available parameter annotations:

  • @Target: this annotation indicates that the advice parameter receives the target of the joinpoint.

  • @Caller: available when intercepting call joinpoints, this annotation is used on the advice parameter that contains the caller.

  • @Arg: contains one of the joinpoint arguments. It has an optional attribute, index, if you need to indicate the exact joinpoint argument you are referring to (this happens when the attributes have the same type and JBoss AOP cannot infer which argument your @Arg-annotated parameter refers to).

  • @Args: this annotation is used on parameters of the type Object[], that contain the full list of the joinpoint arguments. Use this only when necessary, as there is an overhead incurred in creating this array. This annotation differs from @Arg when it comes to flexibility (your advice will be compatible with any joinpoint, regardless of the type and the number of the joinpoint arguments ) and when you need to edit the value of an argument.

  • @Return: available only for after and finally advices. Parameters with this annotation will contain the value returned by the advice.

  • @Thrown: this is available only for after-throwing and finally advices. It allows you to receive the exception thrown by the joinpoint.

  • @JoinPoint: this annotation is used on reflective parameters, containing joinpoint beans, which allow access to any reflective information regarding the joinpoint. For example, if the joinpoint is a method execution, you can have access to the Method object that represents that object, and to the Class object that represents the class declaring that method. For around advices, the joinpoint beans are the Invocation beans. For the other type of advices, the joinpoint beans are the info beans. While the first ones allow extra features, like meta-data recording, they are also heavier when compared with the info beans.


Bellow you will find an example of a finally advice that uses @JoinPoint, @Thrown, @Return and @Caller:
<aop>
  <aspect class="MyAspect"/>
  <bind pointcut="call(public int POJO1->someMethod(..)) AND within(POJO2)">
    <finally aspect="MyAspect" name="myAdvice"/>
  </bind>
</aop>
----
public class MyAspect
{
  public myAdvice(@JoinPoint MethodCall callBean, @Caller POJO2 caller, @Return int returnedValue, @Thrown Throwable thrown)
  {
    System.out.println(“The execution of joinpoint:”);
    System.out.println(callBean.toString());
    System.out.println(“Executed by caller: “ + caller);
    if (thrown == null)
      System.out.println(“Returned “ + returnedValue);
    else
      System.out.println(“Threw an exception: + thrown);
  }
}


Overloaded Advices

JBoss AOP Advices can be overloaded. This is useful when you want to apply the same advice to several different scenarios. Take a look at the example below:
<aop>
  <aspect class="MyAspect"/>
  <bind pointcut="execution(* POJO->someMethod(..) OR execution(POJO->new(..))">
    <before aspect="MyAspect" name="loggerAdvice"/>
  </bind>
</aop>
----
public class MyAspect
{
  public void loggerAdvice(@JoinPoint JoinPointBean joinPointInfo)
  {
    if (joinPointInfo instanceof MethodExecution)
    {
      System.out.println(“Intercepting method execution:” + ((MethodExecution) joinPointInfo).getMethod().getDeclaringClass().getName() + “->” + ((MethodInfo) joinPointInfo).getMethod().getName());
    }
    else if (joinPointInfo instanceof ConstructorExecution)
    {
      System.out.println(“Intercepting constructor execution:” + ((ConstructorExecution)joinPointInfo).getConstructor().getDeclaringClass().getName() + “->new” );
    }
  }
}


This advice checks the type of joinPointBean every time it gets executed, so it can do a type casting and extract the information it needs. The cost of performing these operations every time the advice gets called can be avoided with the use of overloaded advices. Look at the overloaded implementation of loggerAdvice below:

public class MyAspect
{
  public void loggerAdvice(@JoinPoint MethodExecution methodExecution)
  {
    System.out.println(“Intercepting method execution:” + ((MethodExecution) joinPointInfo).getMethod().getDeclaringClass().getName() + “->” + ((MethodInfo) joinPointInfo).getMethod().getName());
  }

  public void loggerAdvice(@JoinPoint ConstructorExecution constructorExecution)
  {
    System.out.println(“Intercepting constructor execution:” + ((ConstructorExecution)joinPointInfo).getConstructor().getDeclaringClass().getName() + “->new” );
  }
}


The overloaded version of loggerAdvice allows a more efficient interception, because JBoss AOP will define when to call which advice method only once per joinpoint, avoiding the extra cost of checking the type of the joinpoint every time it executes. As a plus, you get a cleaner code.


Sintax and Semantics Rules

There are other rules when writing your typed advices. For example, your advice must match the joinpoints it will intercept. You cannot write an advice that receives a target whose type is Collection and declare it to be String. However, you are not supposed to worry about all the rules involved in writing advices. While you can read all the rules at our documentation, there are error messages for each rule you might break. This way, if you break a rule, JBoss AOP will point you what is wrong so you can easily fix it.

As an example, I am going to do a slight change to the myAdvice example given above:

<aop>
  <aspect class="MyAspect"/>
  <bind pointcut="call(public int POJO1->someMethod(..) AND within(POJO2)">
    <finally aspect="MyAspect" name="myAdvice"/>
  </bind>
</aop>
----
public class MyAspect
{
  public myAdvice(@JoinPoint JoinPointBean callBean, @Caller POJO1 caller, @Return int returnedValue, @Thrown Throwable thrown)
  {...}
}


An error has been inserted to the advice above: it receives a caller of type POJO1, while the pointcut expression clearly states that the type of the caller is POJO2. Unless POJO2 extends POJO1, we are going to get an error from JBoss AOP like the one below:

org.jboss.aop.advice.NoMatchingAdviceException: No matching finally advice called 'myAdvice' could be found in MyAspect for joinpoint Method called by Constructor[calling=public POJO2(boolean) throws java.lang.Exception,called=public int POJO1.someMethod(boolean) throws java.lang.Exception]
  On method 'public void MyAspect.myAdvice(org.jboss.aop.joinpoint.MethodCall,POJO1,int,java.lang.Throwable)'
   @Caller-annotated parameter is not assignable from expected type class POJO2


Next steps

This tutorial introduced you to the new typed advices of JBoss AOP. You can see concrete examples in the tutorial that comes bundled with the JBoss AOP distribution. A good way of starting to write typed advices is playing with those examples, changing the code and seeing what are the results.

Besides, you can also consult our Reference Guide, that will describe typed advices in detail, including a complete description of all the rules involving them (Chapter 4. Advices). There you will also find a table of the possible parameter annotations and which types of advices support them. At the end of Chapter 3 (Joinpoint and Pointcut Expressions), you can also find a complete table containing the two joinpoint bean types available: invocation and info beans.

If you have any questions that are not answered at our documentation, open a thread in our user forum and we will answer as fast as we can.

Monday, March 31, 2008

Typed Advices Tutorial - Part 2

Today we will see what are the signature rules a valid typed advice must follow.


Introduction to Annotated Parameters

Typed advices can receive as parameters several context values, besides reflective objects. In this introduction, we will talk only about parameters that receive the joinpoint target and the argument values. The other options will be seen in the next part of this tutorial.


Take a look at the following example:

<aop>
  <aspect class="MyAspect"/>
  <bind pointcut="public int POJO->someMethod(..)">
    <before aspect="MyAspect" name="myAdvice"/>
  </bind>
</aop>
----
public class MyAspect
{
  public myAdvice(@Target POJO pojo, @Arg int arg1, @Arg long arg2)
  {
    System.out.println("Hello world!");
  }
}

This example binds a before advice with the pointcut expression "public int POJO->someMethod(..)". The advice receives as parameters the target of POJO.someMethod execution, and two arguments which should be of type int and long. Now, take a look at the class POJO below:

public class POJO
{
  public void someMethod(int arg1, long arg2){}
  public void someMethod(int arg1, int arg2, long arg3) {}
  public void someMethod(String arg1, int arg2, long arg3) {}
  // public void someMethod(String arg1, int arg2) {}
}

This is what would happen to our advice when it intercepts each one of the methods above:

- someMethod(int arg1, long arg2)
JBoss AOP invokes the advice passing as parameters the POJO target, and the two arguments received by someMethod

- someMethod(int arg1, int arg2, long arg3)
The same as before, but the advice will receive the values of the first and third arguments, skipping int arg2.

- someMethod(String arg1, int arg2, long arg3)
Now the advice will receive the values of arg2 and arg3 as the @Arg-annotated parameters.

Would the last method of POJO, someMethod(String, int), be uncommented, JBoss AOP will throw an InvalidAdviceException telling you that it cannot find a way of applying your advice to a method that does not receive a long-typed argument.

Now, look at the second version of our advice below:

public class MyAspect
{
  public myAdvice(@Target POJO pojo, @Args Object[] args)
  {
     if(args.length > 0 && args[0] instanceof Integer)
     {
       // the intercepted method will receive a new int argument value
       args[0] = Integer.valueOf(args[0].intValue() - 1);
     }
  }
}

This advice receives the list of the intercepted method arguments regardless of the number and type of arguments declared by this method. This would allow us to uncomment POJO.someMethod(String, int) without getting an InvalidAdviceException. Besides, any changes performed to the values contained in the args array will be propagated to the joinpoint. This allows myAdvice to edit the value of a joinpoint argument, as shown above.

Flexibility and Parameter Annotations

So what you are probably asking yourself is why do you have to use the annotations @Target, @Arg and @Args to indicate the meaning of each of your advice's parameters.

The answer to this question is flexibility. Take a look at the two different advices below:

public void advice1(@Target Object target)
public void advice2(@Arg Object arg)

As you can see, you do not have to specify the exact type of the target of the joinpoint, as we did before. Instead of @Target POJO, our example could have used @Target Object as the advice parameter, which is useful when your advice is going to be applied to several different target types. This is what advice1 above does: it does not specify the type of the target. JBoss AOP will successfully apply this advice to any joinpoint, regardless of the type of the target.

The second advice, advice2, also does not specify the type of the argument it wants to receive. So it will receive as parameter the first non-primitive argument of the intercepted joinpoint.

Now, if we remove the parameter annotations from advice1 and advice2, we will not be able of differentiating between those advices, except for their names. Hence, JBoss AOP will not be able of knowing what value it should provide to the advice parameter. This gets more complex when you have more than one advice parameter, as the example below:

public void advice1(@Target Object target, @Arg Object arg)
public void advice2(@Arg Object arg, @Target Object target)

Both advices receive the joinpoint target and the first non-primitive joinpoint argument value. How could we differentiate between them and decide what value to pass to each of those advice parameters without the annotations?

This makes the parameter annotation usage essential to achieve total flexibility regarding what to receive as parameter value, and in which type and order. So, when writing your typed advices you must follow the rule below:

The parameters of a typed advice must be annotated.

Advice Return Type

All the typed advices we have seen so far had a void return type.

This is not mandatory. After and finally advices are allowed to have a non-void return type. Take a look at the following example:

<aop>
  <aspect class="MyAspect">
  <bind pointcut="">*(..)">
    <after aspect="MyAspect" name="myAdvice"/>
  </bind>
</aop>
----
public MyAspect
{
  public String myAdvice()
  {
     return "Hello world!";
  }
}

The advice above intercepts all methods of POJO that return a String and it overwrites the method return value, by returning the string "Hello World".

In practice, this is useful for aspects that perform extra actions on the joinpoint return type. For example, an aspect that implements a remote call layer would want to deserialize the return value of a remote call before providing the result to the caller.

Throwing Exceptions

Your advice is allowed to declare to throw any exceptions you like. JBoss AOP will wrap that exception inside a RuntimeException if this exception is not declared by the intercepted joinpoint. On the other hand, if the joinpoint declares to throw that exception type, JBoss AOP will just throw the exception as is. Either way, the basis application will get the exception as if the intercepted joinpoint had thrown it.

Part III Preview

In the next part, we will see the complete list of parameter annotations available. Besides, we will talk about overloaded advices. See you!

Monday, March 24, 2008

Typed Advices Tutorial - Part 1

As we get closer and closer to our 2.0.0.GA release, I found it would be interesting to post a tutorial on typed advices, one of the new features of the next GA release.

The tutorial, targeted to users already familiar with the basics of JBoss AOP, will be split into parts. The plan is to post a new part every Monday. Enjoy!

Typed Advices Tutorial - Part 1

In this part, we will see what are the new types of advices and how to declare a binding using typed advices.


5 Different Types

JBoss AOP now supports 5 types of advices:

  • before: advices of this type are executed before the joinpoint.
  • around: this is equivalent to the single advice type previously supported by JBoss AOP. Around advices work like the interceptors, wrapping the joinpoint execution. They are invoked by JBoss AOP as if they were the original joinpoint, and it is up to them to proceed execution to the joinpoint itself, through the method invokeNext() of the class Invocation.
  • after: advices of the type after are executed after the joinpoint returns normally.
  • throwing: advices of this type are invoked only after the joinpoint throws an exception. If the joinpoint returns normally, these advices will not be called.
  • finally: these advices are invoked after the joinpoint execution, regardless of the way it returns.


The before, after, throwing and finally advices are more lightweight when compared with around advices. Hence, they must be chosen whenever possible over around advices.

Binding Typed Advices

In the previous versions of JBoss AOP, the XML tag advice was the only choice to declare an advice. This tag must be inside a bind tag, like the example below:

<bind pointcut="execution(* *->(..))">
   <advice aspect="Aspect" name="myAdvice"/>
</bind>

Notice that "Aspect" must have been declared before the bind tag, in an aspect tag.

To declare a typed advice, the XML would be similar to the above, except for the fact that the tag advice will be replaced by a tag with the name of the type of the advice you want to bind.

The example below binds five advices, one of each type. As you can see, the tags before, after, around, throwing, and finally have the same attributes as the tag advice.

<bind pointcut="execution(* *->(..))">
   <before aspect="Aspect" name="myBeforeAdvice"/>
   <around aspect="Aspect" name="myAdvice"/>
   <after aspect="Aspect" name="myAfterAdvice"/>
   <throwing aspect="Aspect" name="myThrowingAdvice"/>
   <finally aspect="Aspect" name="myFinallyAdvice"/>
</bind>


Notice that the tag advice is also supported in the new JBoss AOP version. As this tag does not indicate the type of the advice being declared, the default type, around, will be used. This keeps compatibility with previous versions, garanteeing that no AOP code will be broken when upgrading to the new release.

To allow declaration of typed advice bindings through annotations, a new attribute has been added to the annotation @Bind:

@Bind(pointcut="execution(* *->(..))", type=AdviceType.BEFORE)

The example above shows an advice annotation that binds the annotated advice (hidden in the example) to the same pointcut we saw in the previous examples. It also specifies the type of the advice as being before. Similarly, we can declare advices of all the other four types. The annotation parameter type is optional and its default value is AdviceType.AROUND.

Notice that the class that contains the advice must be annotated with @Aspect in order to be recognized as an aspect by JBoss AOP.

An Example of Typed Advice

The following Java method is a simple example of typed advice:

public void myAdvice()
{
   System.out.println("Hello world!");
}

The signature of typed advices is pretty flexible, allowing even void advices with no parameters at all. The only type of advice that cannot have the above signature is the throwing advice. As we will see, this advice has a mandatory parameter. This means that the method above could be a before, around, after, or finally advice.

In the next part of this tutorial we will see more about the signature rules, showing how an advice can receive pretty much any joinpoint information as a parameter.

See you next week!

Friday, February 1, 2008

JBoss AOP 2.0.0.CR4 released

The 2.0.0.GA release is getting closer and closer. The latest release is JBoss AOP 2.0.0.CR4.

You can download it here, and view the release notes here.

AOSD 2007

I will be presenting the work done on the integration between the JBoss Microcontainer and JBoss AOP, and how this is used in JBoss AS 5, at the AOSD 2008 conference. It takes place in Brussels 31 March - 1 April, and my talk will be part of the industry track on AOSD in Middleware. The slot is a bit short for all I have to say, but it should give you an idea :-)

Hopefully see you there,

Kabir